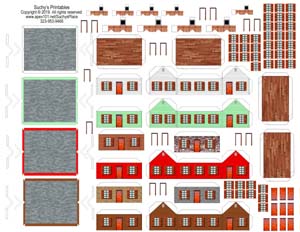
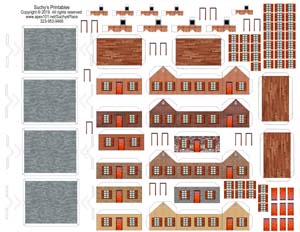
These patterns may be purchased as files so you can print as many houses as you like or as preprinted sheets (shipping
applies and you are limited to the sheet(s) you buy, BUT I can guarantee you a high quality, durable print on 110# card stock. The extra walls are
optional – many real world houses have decorative fronts.
The houses are pretty straight forward, but I recommend you follow these directions:
Cut out two wall panels, a roof panel and a floor panel. DO NOT cut off the white folding tabs or cut apart the walls unless you are an experienced expert model maker. Using a pair
of wall panels beside each other will give the best match, but is not required.
Score wall and tab edges as needed and fold so the printing is outside the glued model. * Floor panel tabs should be folded down unless you plan to cut out the window panes (not recommended) to see inside the
model. The short tabs should be folded/scored just inside the printed lines.
Glue one long floor tab to the back wall, carefully positioned so the edge of the floor will hold the side walls square to the back and clamp until dry.
Glue one side wall to the floor and clamp. If possible, glue the other side wall to the floor and clamp.
Carefully match one side of the front wall to a side wall, glue and clamp.
Carefully match the remaining house corner. Glue the front wall to the other side wall and, if possible, to the floor. Clamp at least the wall-to-wall joint.
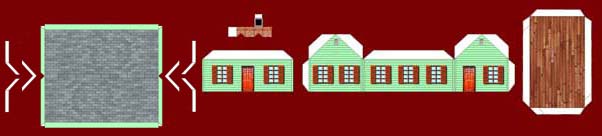
On the roof, the center row of shingles is larger to cover the roof crest. Line up your straight edge under the center of this row of (larger) shingles and fold without scoring. This simulates the cap
shingles on a real roof.
A set of eaves surrounds each roof for detail. If you dont want to bother, cut them off and skip to step 12.
Carefully cut the outer eave edges and the small 6 V notches at the corners and apex of the roof.
Score the eaves at the edge of the printed shingles and fold the roof crest and the eaves at right angles to the roof (the long ones will fold back out to hang straight down).
Very carefully cut out the 6 eaves-keepers. The 4 with inner lines should be folded at right angles as drawn to connect the eaves in place at the roof corners. The two Vs set the roof slant correctly
and hold the eave crests in line. OR, you cah fold the eaves perfectly into place and put a dab of glue behind each place where they meet. Care is needed either way. When dry, the roof is now ready to install.
Due to the floor, the house should be already square. If not, start over with new parts at step 1.
Apply glue sparingly to all 6 roof tabs. Place roof on walls so the overhang is the same on each end of the house. Weight or hold in place until dry.
Optionally, cut out a chimney and fold on all 6 lines, scoring if you use thick paper. Ive supplied scale size chimneys for purists, and larger ones for people who have trouble with the smaller ones.
Glue and clamp the brick sides first, making sure they line up right.
Fold the top tab inside the bricks and glue so the top is level and appears to seal with the brick edges.
A dab of glue on the bottom edge will secure the chimney to the house, but to be sure you may wish to fold a tiny piece of scrap paper or two to use as double tabs (not recommended).
Repeat to make as many houses as you need..
NOTES:
While the floors are optional, they make it much easier to keep the house square.
Ive supplied several extra chimneys in case of problems.
Ive also supplied extra doors and windows to cut out and paste over the printed ones for physical relief. Thats optional. If youre really into high scale you could try cutting only the frames, leaving
the doors and windows recessed. Further, you could cut the panes out of the windows (on the base model, too) and glue cellophane behind them. Feel free to add your own create.
Get some fine soft pencils, pastels or other dry coloring media to cover any edges that show where folded or cut off (example: gray for roof edges). While not necessary on white walls, the edges of glued on doors
and windows may need it the most.