These patterns may be purchased as files so you can print as many churches as you like or as preprinted sheets (shipping
applies and you are limited to the sheet(s) you buy, BUT I can guarantee you a high quality, durable print on 110# card stock).
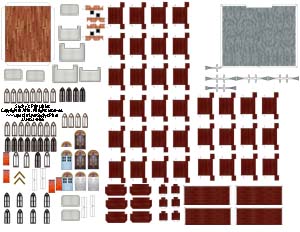
The church is a more complex model and I recommend you follow these directions:
The drawing includes tab numbers to match up most parts correctly. Do the best you can with those until I can get more complete instructions posted here. Looking closely at the main
sheet, you will see that there are parts here for two churches except for the floor. A second floor is provided on the "interior" sheet. The three main parts (the tower, front wall and wrap-around walls)
have a choice of stained glass or plain glass windows, and there are extra windows and doors if you want to change anything or show some extra 3D looks. Feel free to mix and match these as you
like. The choice is yours.
INSTRUCTIONS:
Decide whether you want to build your church with only the paper pattern or add a few parts for a better product. I found the following to be very useful:
a few inches of 1/32" x 1/64" brass for the cross.
Some 1/32" wood for the stairs – I prefer balsa as it is easy to trim.
Make front wall:
Cut out one front wall (part A).
Cut out the center where the "A" label is – knife and straight edge recommended.
Score tabs R1 and R2 on the front of the wall and fold back squarely.
Set aside for a bit.
Assemble tower:
Cut out one church tower (part B).
Score tabs 1 and 2 on the back, 1 paper thickness away fron the edge of the wall.
Score all other wall edges and tabs on the front at the exact edge.
Cut out roof peak support (part B1). Score the tabs on the back of the paper and the center fold on the front.
Fold the part to fit the peak in the roof side of the tower then glue tabs 3 and 4 behind the tower wall with the fold exactly in the peak. Clamp until dry.
Fold all tabs and wall edges back except tab 1 and tab 2.
Glue tab 8 behind wall 8, matching the top of the wall to the edge of the platform.
Glue tab 7 under the platform matching the edges.
Glue tabs 5 and 6 to the back of the remaining wall matching all edges.
Insert tabs 1 and 2 through the hole in the front wall and fold outward.
Stand the two parts up together to make sure the bottom edges match and glue tabs 1 and 2 in place, making sure all walls meet correctly.
Glue tabs 21 through 24 to the front of the front wall, matching them correctly.
Add on the remaining walls:
Cut out one set of 3 walls (2 side walls and the back – part C).
Score all tabs and wall corners on the printed side of the paper.
Fold back on all scores – Tabs R3 and R6 to match the roof slant and the rest squarely.
Match Tab 10 exactly to the left end of the front wall and glue in place.
Repeat with Tab11 and the other end of the front wall.
Optionally, install the floor (keeps church square and can be seen if you cut windows):
Cut out the floor (part O).
Score the four tabs and fold down.
Insert floor in bottom of church, "wood" side up and glue in place.
Make and install the roof:
Cut out the roof leaving the red centerline marks attached temporarily.(part D).
Line up the edge of a stright-edge under the red marks and fold without scoring to make a realistic ridge line.
Cut off the paper with the red linesleaving just the roof.
The eaves (white tabs at the edges of the roof) are optional if more true to scale. If you don't want to use them cut them off and skip to step 7.
Cut and score the eaves as shown.
Fold eave corner tabs flat back and glue.
Fold all 6 eaves so they hang straight down when the roof is on the church.
Glue the eave corners in this position.
Cut out one peak keeper (shown) and glue it behind the eaves where they meet at the back peak of the roof. Make sure the eaves meet exactly so they look right and the roof angle is correct.
NOTE: you may use the other pieces pictured here as corner keepers for the eaves at your option.
Fit the notch in the roof around the tower and glue the roof onto the church.
Make the steeple:
Cut out one steeple pattern.(part E). Use care as the bottom edges and tabs are a bit complex.
Score all shingle edges on the front.
Score the tab extensions on the back at the outer edge of the red band and fold up.
Fold the steeple bottom tabs back against the shingles and glue only to the red area.
Fold the rest of each bottom tab back beyond the shingle edges..
Fold the steeple into shape and glue tab 12 to make a square based roof for the tower.
Fold the loose parts of tabs 6 through 9 together and glue in place to make a flat platform to sit on top of the tower.
Set steeple aside until the cross is ready.
Make front steps:
Cut out one set of three steps of graduated sizes (parts F).
Confirm that the latger two steps fit snugly around the church tower, trimming if necessary.
Make the individual steps:
Paper only method:
Cut and score each step as shown.
Fold the step tabs directly back and glue them to the back of the step edges.
Fold the step edges down and glue them together to make 3 square-edged slab steps.
Paper and 1/32" wood: (I prefer balsa as it's easy to cut.)
Cut off all step sides and tabs.
Glue remaining part of each step onto the wood.
When dry, carefully cut all edges of each step straight down to form square-edged slab steps, including cut the indents in the larger steps.
Alternate paper and 1/32" wood:
Cut out blocks of wood to fit perfectly under each step top. The indents should not be cut in them yet.
score each step as marked and cut out the edge tabs.
Fold down the step edges and glue each step onto the correct wood rectangle.
Trim off any step edges that fall below the wood.
Cut out the wood for the indents on the larger steps to fit around the tower.
With the church sitting on a flat surface, glue the largest step around the tower without gluing it to the surface.
Glue the middle step onto the first and around the tower.
Glue the smallest step on top, centered under the church door.
Make and install the cross (part G:
Paper only cross (possible but weak and subject to warping):
cut out full cross pattern (2 crosses joined at the top with steeple segments at both bottoms).
Lightly score the point where the cross tops meet.
Glue the back of one cross from the top to just above the printed steeple peak.
Fold the crosses together to make one cross and let dry.
Separate the cross bottoms and glue the steeple segments to oposite sides of the steeple to match and "disappear".
Glue the steeple on top of the church tower in the position you desire.
Paper cross with 1/32"x1/64" brass or 1/32" square wood (stronger but cross arms may warp a little):
Poke a small hole in the black dot in the center of the top of the church tower.
Cut one piece of wood or brass 1-5/8" (4.2cm) long.
Cut out the white portion of ONE cross and glue the top of it along one end of thewood or brass piece.
Turn this over and glue two 7/64" (2.5mm) pieces of wood or brass along the cross arms.
Cut out the other single paper cross and glue it over the wood or brass pieces to form the cross back.
Make a small hole in the peak of the steeple, push the cross through it until only the white paper is left on top then glue from the inside of the steeple.
Place the steeple on top of the tower, making sure the extension of the cross fits into the center hole in the tower top, and glue in place
Brass only or brass and wood cross (may be the best option):
Poke a small hole in the black dot in the center of the top of the church tower.
Cut one piece of brass 1-5/8" (4.2cm) long.
Lay this along the long part of a paper cross (no need to cut that out) with one end at the folding point.
Cut a 1/4" (6.35mm) piece of brass or wood and glue it crosswise to form the arms of the cross.
Glue on a 7/16" (11.11mm) and a 7/64" (2.78mm) piece of he same material to finish the "back" of the cross above the steeple.
Turn the piece over and glue two 7/64" (2.78mm) pieces of brass on thr "front" of thr cross arms.
Make a small hole in the peak of the steeple, push the cross through it until only the "back" on the cross is left on top then glue from the inside of the steeple.
Place the steeple on top of the tower, making sure the extension of the cross fits into the center hole in the tower top, and glue in place
Repeat this proceedure for each church you need.
NOTES:
While the floors are optional, they make it much easier to keep the building square.
Ive supplied several extra chimneys in case of problems.
Ive also supplied extra doors and windows to cut out and paste over the printed ones for physical relief. Thats optional. If youre really into high scale you could try cutting only the frames, leaving
the doors and windows recessed. Further, you could cut the panes out of the windows (on the base model, too) and glue cellophane behind them. Feel free to add your own create.
Get some fine soft pencils, pastels or other dry coloring media to cover any edges that show where folded or cut off (example: gray for roof edges). While not necessary on white walls, the edges of glued on doors
and windows may need it the most.